
こんにちは。カルークです。最近、XGBoostやOptunaの使い方を勉強したので、自分用の備忘録を兼ねてまとめたいと思います。
XGBoostとは
XGBoostは、勾配Boostingと呼ばれる決定木とアンサンブル学習を組み合わせた機械学習の手法です。2014年に発表された手法ですが、今でもKaggleなどではよく使われている手法です。
Optunaとは
Optunaは、ハイパーパラメータを最適化するためのフレームワークです。開発は、日本が世界に誇るAI企業であるPreferred Networks社が行っています。
Optunaを使わないでもハイパーパラメータチューニングを行うことは出来ますが、ランダムサーチやグリッドサーチ(総当り)など効率の悪い手法で行う事が多いです。一方、Optunaを用いるとベイズ最適化により、効率の良いパラメータ探索が可能となるようです。以下、Preferred Networksからの引用文です。
Optuna は次の試行で試すべきハイパーパラメータの値を決めるために、完了している試行の履歴を用いています。そこまでで完了している試行の履歴に基づき、有望そうな領域を推定し、その領域の値を実際に試すということを繰り返します。そして、新たに得られた結果に基づき、更に有望そうな領域を推定します。具体的には、Tree-structured Parzen Estimator というベイズ最適化アルゴリズムの一種を用いています。
https://tech.preferred.jp/ja/blog/optuna-release/
実行環境
- OS: Windows 10 Pro (64-bit)
- Anaconda: conda version 4.9.2
- Python: 3.8
- 実行環境: jupyter notebook
今回学習用に用いたデータセット
今回学習用に用いたデータセットは、KaggleのNew York City Taxi Fare Predictionです。このコンペでは、ニューヨークのタクシーを利用した際の料金(通行料含む)を、乗降場所から予測することを競います。
Dataタブを選択し、”train.csv”を予めダウンロードしておきます。データサイズは5GBを超えるのでWiFiなどで落とす方が良いです。
なお、kaggleのユーザアカウントをお持ちでない場合は作成が必要です。また、初回ダウンロード時にはデータの取り扱いなどに関する規約への同意が必要になります(Acceptボタンを押すだけ)。
XGBoostを使ってみる
ここでは、XGBoostの使い方について書きます。前処理も含めてまとめるので、少し冗長となりますがご了承ください。
インストール
Anacondaを利用している場合、Anaconda promptを起動して以下のコマンドを入力します。
conda install -c conda-forge xgboostAnaconda以外の場合は、以下のコマンドを入力します。
pip install xgboost(前処理に)必要なライブラリのインポート
前処理やデータ可視化に必要なライブラリをインストールしておきます。
import pandas as pd
import numpy as np
import matplotlib.pyplot as plt
%matplotlib inline
plt.style.use('ggplot')
import seaborn as sns
データの読み込み
データの読み込みを行います。(事前にdataフォルダを作成し、その中にtrain.csvが置いてある物とします)
train.csvは、55,423,857行の巨大データであり、私のパソコンでは処理しきれないので上から5500行だけ読み込む事とします。
df = pd.read_csv("./data/train.csv", nrows=5500)
df.head()
出力:

データの素性を確認
まずはデータの素性を確認します。
df.info()# 出力
<class 'pandas.core.frame.DataFrame'>
RangeIndex: 5500 entries, 0 to 5499
Data columns (total 8 columns):
# Column Non-Null Count Dtype
--- ------ -------------- -----
0 key 5500 non-null object
1 fare_amount 5500 non-null float64
2 pickup_datetime 5500 non-null object
3 pickup_longitude 5500 non-null float64
4 pickup_latitude 5500 non-null float64
5 dropoff_longitude 5500 non-null float64
6 dropoff_latitude 5500 non-null float64
7 passenger_count 5500 non-null int64
dtypes: float64(5), int64(1), object(2)
memory usage: 343.9+ KB続いてdescribeでデータの概要を見てみます。
df.describe()出力
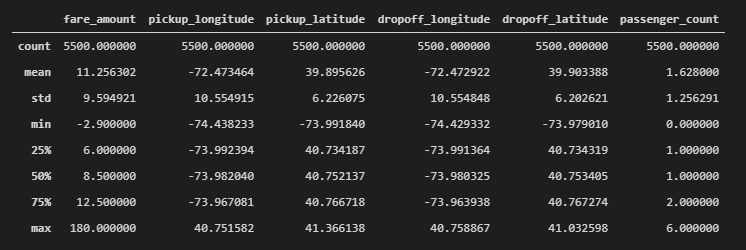
料金がマイナスのレコードがあったり、(ニューヨーク付近であるはずなのに)緯度経度がバラついていそうなど、いくつか不正な値が含まれている事が確認できます。
欠損値も確認してみます。
df.isnull().sum()# 出力
key 0
fare_amount 0
pickup_datetime 0
pickup_longitude 0
pickup_latitude 0
dropoff_longitude 0
dropoff_latitude 0
passenger_count 0
dtype: int64欠損値は見られませんでした。
前処理
料金(fare_amount)の不正値を除去
まずは料金がマイナス(不正な値)を排除します。
df = df[df["fare_amount"] > 0]
df.shape
# 出力
(5498, 8)2件の不正な値を除去しました。プラスの値に関しても、大きすぎる値は外れ値として除去した方が精度が上がる事が一般的なので、まずは分布がどうなっているのか確認してみます。
plt.figure(figsize=(12,8))
plt.hist(df["fare_amount"], bins=100)
plt.show()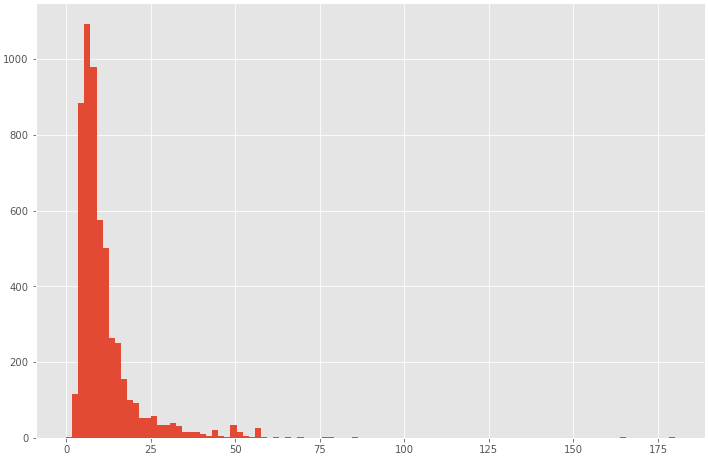
ほとんどのケースが0~100ドルに収まるようなので、100ドル以上を欠損値として削除し、再度分布を表示してみます。
df = df[df["fare_amount"] < 100]
plt.figure(figsize=(12,8))
plt.hist(df["fare_amount"], bins=100)
plt.show()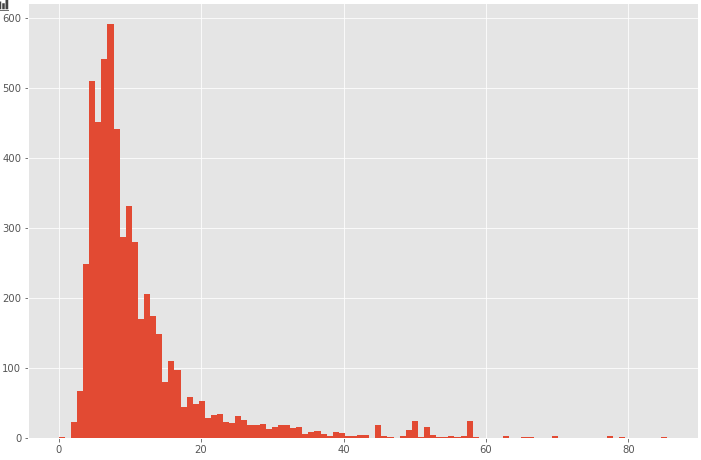
続いて四分位範囲を使って範囲から外れている値を取り除く処理を行います。
def outlier_iqr(df, columns=None):
    if columns == None:
        columns = df.columns

    for col in columns:
        q1 = df[col].describe()["25%"]
        q3 = df[col].describe()["75%"]
        # 四分位範囲
        iqr = q3 - q1

        outlier_min = q1 - iqr * 1.5
        outlier_max = q3 + iqr * 1.5

        # 範囲から外れている値を除く
        df = df[(df[col] >= outlier_min) & (df[col] <= outlier_max)]

    return df

print("before", df.shape)
df = outlier_iqr(df, columns=["fare_amount"])
print("after", df.shape)
# 出力
before (5496, 8)
after (5029, 8)欠損値除去により、5029件まで減りました。再度、分布を描画します。
plt.figure(figsize=(12,8))
plt.hist(df["fare_amount"], bins=50)
plt.show()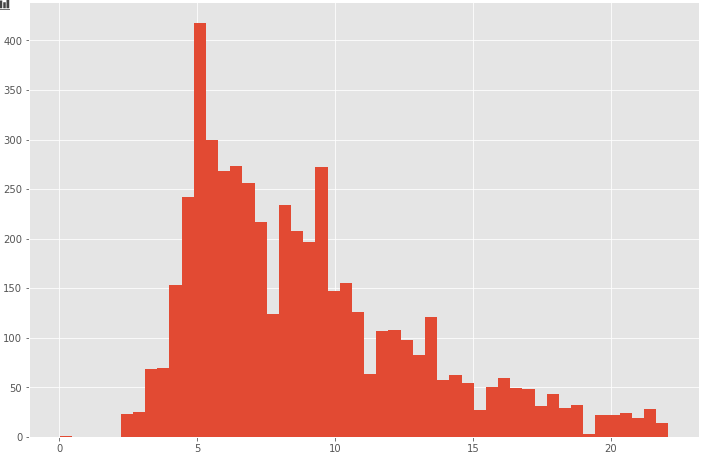
乗車緯度経度、降車緯度経度の不正値を除去
続いて、乗車緯度経度、降車緯度経度についての不正な値を除去していきます。今回のコンペデータはニューヨークのタクシーなので、ニューヨーク付近の緯度経度以外は不正な値とみなすことにします。具体的には、-75 < longitude < -73, 40 < latitude < 42のみ残す事にします。
print("before", df.shape)
df = df[(df["pickup_longitude"] > -75) & (df["pickup_longitude"] < -73)]
df = df[(df["pickup_latitude"] > 40) & (df["pickup_latitude"] < 42)]
df = df[(df["dropoff_longitude"] > -75) & (df["dropoff_longitude"] < -73)]
df = df[(df["dropoff_latitude"] > 40) & (df["dropoff_latitude"] < 42)]
print("after", df.shape)
# 出力
before (5029, 8)
after (4925, 8)乗客数(passenger_count)の不正値を除去
乗客数について、value_counts()にて値の構成具合を見てみます。
df["passenger_count"].value_counts()1 3519
2 668
5 327
3 216
6 89
4 88
0 18
Name: passenger_count, dtype: int640人の乗客数というのは意味がわからないので削除します。
print("before", df.shape)
df = df[df["passenger_count"] > 0]
print("after", df.shape)
# 出力
before (4925, 8)
after (4907, 8)4907レコードまで減りました。
もう一度、describe()にてデータの概要を見てみます。
df.describe()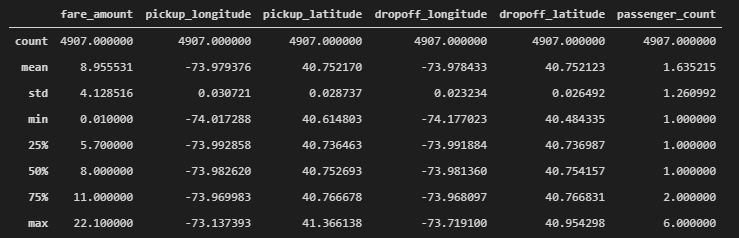
不正な値はだいたい取り除くことが出来たようです。
特徴量エンジニアリング
続いて、特徴量エンジニアリングを行います。
移動距離、移動方向を作成
ここでは、乗降場所の緯度経度から移動距離(distance)を求めるのと、移動した方向(azimuth)を求め、新たな特徴量としたいと思います。
def calculation_distance(x_1, y_1, x_2, y_2):
    # 赤道半径 (km)
    R = 6371
    # Radian角に変換
    _x1, _y1, _x2, _y2  = map(np.radians, [x_1, y_1, x_2, y_2])

    delta_x = _x2 - _x1
    delta_y = _y2 - _y1

    # 距離を計算
    a = np.sin(delta_y/2.0)**2 + np.cos(_y1) * np.cos(_y2) * np.sin(delta_x/2.0)**2
    return 2 * R * np.arcsin(np.sqrt(a))

def calculation_azimuth(x_1, y_1, x_2, y_2):
    # Radian角に修正
    _x1, _y1, _x2, _y2 = map(np.radians, [x_1, y_1, x_2, y_2])

    delta_x = _x2 - _x1
    _y = np.sin(delta_x)
    _x = np.cos(_y1) * np.tan(_y2) - np.sin(_y1) * np.cos(delta_x)

    psi = np.rad2deg(np.arctan2(_y, _x))

    return np.where(psi < 0, 360 + psi, psi)
distance特徴量を作成
df["distance"] = calculation_distance(df["pickup_longitude"],
                                      df["pickup_latitude"],
                                      df["dropoff_longitude"],
                                      df["dropoff_latitude"])
df.head()
azimuth特徴量を作成
df["azimuth"] = calculation_azimuth(df["pickup_longitude"],
                                      df["pickup_latitude"],
                                      df["dropoff_longitude"],
                                      df["dropoff_latitude"])
df.head()
時間の特徴量を作成
データに元から入っているpickup_datetimeは年月日時間がすべて混ざって入ってしまっているので、ここでは時間、日、月、平日/休日、年の情報に分けて新たに特徴量を作成したいと思います。
df["pickup_datetime"] = pd.to_datetime(df["pickup_datetime"], format="%Y-%m-%d %H:%M:%S UTC")

df["hour"] = df["pickup_datetime"].dt.hour
df["day"] = df["pickup_datetime"].dt.day
df["month"] = df["pickup_datetime"].dt.month
df["dayofweek"] = df["pickup_datetime"].dt.dayofweek
df["year"] = df["pickup_datetime"].dt.year

df.head()
データの分割
ここでは、scikit-learnのインポートを行い学習用データ、テスト用データに分割を行います。
from sklearn.model_selection import train_test_split今回は料金 (fare_amount)を予測したいので、yをfare_amountに設定します。
X = df.drop(columns=["key", "fare_amount", "pickup_datetime"])
y = df["fare_amount"]
print(X.shape)
print(y.shape)
# 出力
(4907, 12)
(4907,)続いて、データをtrain/testに分割します。分割割合は8:2とします。random_stateは再現性確保のためのシード固定用変数です。シード値は0としましたが、他の値を設定しても問題ないです。
X_train, X_test, y_train, y_test = train_test_split(X, y, test_size=0.2, random_state=0)
print(X_train.shape)
print(X_test.shape)

print(y_train.shape)
print(y_test.shape)
(3925, 12)
(982, 12)
(3925,)
(982,)以下の図のような感じで分割が出来ました。trainデータでCross Validation(交差検証)を行ってパラメータチューニングをし、最後にtestデータで精度の確認をする事がよく行われる評価の方法です。

前置きが長くなってしまいましたが、次からがXGBoostに関する説明になります。
XGBoostのインポート
XGBoostをインポートします。
import xgboost as xgbXGBoost (1) 基本的な使い方
まずは基本的な使い方として、適当なパラメータを代入し、trainデータで学習し、testデータで評価を行ってみます。パラメータの理論的な説明についてはここでは割愛します。
重要そうなポイントとしては、
- eval_metricでステップごとに何を最適化していくかを指定。ここではrmse(二乗平均平方根誤差。予測と正解の差が小さいほど精度が良く、rmseも小さくなる)を指定していて、これを最小化するようにパラメータ更新が行われる。
- DMatrixでdataの変換が行われているが、xgboostを実行するにはDMatrixを使って専用のデータ形式に変換が必要
- early_stopping_rounds=5で、rmseが5回以上良くならないのならnum_boost_round=1000回を待たずして学習を終えるようにする
params = {
    "silent": 1,
    "max_depth": 6,
    "min_child_weight": 1,
    "eta": 0.1,
    "tree_method": "exact",
    "objective": "reg:linear",
    "eval_metric": "rmse",
    "predictor": "cpu_predictor"
}

# xgboostを実行するには特殊なmatrixにする必要がある
dtrain = xgb.DMatrix(X_train, label=y_train)
dtest = xgb.DMatrix(X_test, label=y_test)

# 学習、評価
model = xgb.train(params=params,
                  dtrain=dtrain,
                  num_boost_round=1000,
                  early_stopping_rounds=5,
                  evals=[(dtest, "test")]) # dtestで評価を行う
# 出力
[20:18:08] WARNING: d:\bld\xgboost-split_1619725139497\work\src\objective\regression_obj.cu:171: reg:linear is now deprecated in favor of reg:squarederror.
[20:18:08] WARNING: ..\src\learner.cc:573:
Parameters: { "silent" } might not be used.
This may not be accurate due to some parameters are only used in language bindings but
passed down to XGBoost core. Or some parameters are not used but slip through this
verification. Please open an issue if you find above cases.
[0] test-rmse:8.52693
[1] test-rmse:7.74526
[2] test-rmse:7.04625
[3] test-rmse:6.42359
[4] test-rmse:5.86927
[5] test-rmse:5.37025
[6] test-rmse:4.93316
[7] test-rmse:4.54215
[8] test-rmse:4.19679
[9] test-rmse:3.89374
[10] test-rmse:3.62487
[11] test-rmse:3.40313
[12] test-rmse:3.20255
[13] test-rmse:3.02622
[14] test-rmse:2.87763
[15] test-rmse:2.74546
[16] test-rmse:2.64045
[17] test-rmse:2.54524
[18] test-rmse:2.45699
[19] test-rmse:2.38888
[20] test-rmse:2.33212
[21] test-rmse:2.28386
[22] test-rmse:2.24131
[23] test-rmse:2.20322
[24] test-rmse:2.17492
[25] test-rmse:2.14645
[26] test-rmse:2.12746
[27] test-rmse:2.10862
[28] test-rmse:2.09503
[29] test-rmse:2.07912
[30] test-rmse:2.06893
[31] test-rmse:2.05492
[32] test-rmse:2.04419
[33] test-rmse:2.03743
[34] test-rmse:2.03218
[35] test-rmse:2.02803
[36] test-rmse:2.02493
[37] test-rmse:2.02297
[38] test-rmse:2.02084
[39] test-rmse:2.02031
[40] test-rmse:2.01688
[41] test-rmse:2.01340
[42] test-rmse:2.01127
[43] test-rmse:2.01115
[44] test-rmse:2.00680
[45] test-rmse:2.00691
[46] test-rmse:2.00504
[47] test-rmse:2.00228
[48] test-rmse:1.99880
[49] test-rmse:1.99780
[50] test-rmse:1.99804
[51] test-rmse:1.99660
[52] test-rmse:1.99379
[53] test-rmse:1.99371
[54] test-rmse:1.99077
[55] test-rmse:1.99048
[56] test-rmse:1.98884
[57] test-rmse:1.98762
[58] test-rmse:1.98602
[59] test-rmse:1.98446
[60] test-rmse:1.98269
[61] test-rmse:1.98222
[62] test-rmse:1.98158
[63] test-rmse:1.97978
[64] test-rmse:1.97835
[65] test-rmse:1.97846
[66] test-rmse:1.97864
[67] test-rmse:1.97977
[68] test-rmse:1.97877
[69] test-rmse:1.97746
[70] test-rmse:1.97906
[71] test-rmse:1.97994
[72] test-rmse:1.97812
[73] test-rmse:1.97824
[74] test-rmse:1.97788XGBoost (2) Grid Search + Cross Validation でパラメータチューニング
ここでは、グリッドサーチ(総当りで良いパラメータを探す方法)しながら、クロスバリデーションして良いパラメータを見つける事をします。
探索するパラメータを決める
まずはパラメータの組み合わせを決めます。max_depthの候補を6,7,8、etaの候補を0.1, 0.05, 0.01として全ての組み合わせをタプルで作成しリストにします。
gridsearch_params = [
    (max_depth, eta)
    for max_depth in [6,7,8]
    for eta in [0.1, 0.05, 0.01]
]

gridsearch_params
# 出力
[(6, 0.1),
(6, 0.05),
(6, 0.01),
(7, 0.1),
(7, 0.05),
(7, 0.01),
(8, 0.1),
(8, 0.05),
(8, 0.01)]グリッドサーチによるハイパーパラメータ探索
グリッドサーチ+クロスバリデーションでハイパーパラメータのチューニングを行います。クロスバリデーションの分割数は5とし、先程同様にrmseを最小化するような学習で最適化を行います。
min_rmse = float("Inf") # 最初は無限大に設定しておく
best_param = []

for max_depth, eta in gridsearch_params:
    print("max_depth={}, eta={}".format(max_depth, eta))

    params["max_depth"] = max_depth
    params["eta"] = eta

    cv_results = xgb.cv(
        params,
        dtrain,
        num_boost_round=1000,
        seed=0,
        nfold=5, # CVの分割数
        metrics={"rmse"},
        early_stopping_rounds=5
    )

    mean_rmse = cv_results["test-rmse-mean"].min()
    boost_rounds = cv_results["test-rmse-mean"].argmin()
    print("RMSE {} for {} rounds".format(mean_rmse, boost_rounds))
    if mean_rmse < min_rmse:
        min_rmse = mean_rmse
        best_param = (max_depth, eta)

print("Best params {}, RMSE {}".format(best_param, min_rmse))
# 出力(途中、省略)
max_depth=6, eta=0.1
[20:18:08] WARNING: d:\bld\xgboost-split_1619725139497\work\src\objective\regression_obj.cu:171: reg:linear is now deprecated in favor of reg:squarederror.
[20:18:08] WARNING: ..\src\learner.cc:573:
Parameters: { "silent" } might not be used.
This may not be accurate due to some parameters are only used in language bindings but
passed down to XGBoost core. Or some parameters are not used but slip through this
verification. Please open an issue if you find above cases.
RMSE 1.9689713999999998 for 135 rounds
・・・(長いので、途中省略)
RMSE 2.0228512 for 808 rounds
Best params (6, 0.01), RMSE 1.9591660000000002ハイパーパラメータチューニングが終わりました。一番良かったパラメータを調べます。
best_param# 出力
(6, 0.01)max_depthが6, etaが0.01で最も精度(RMSE)が良くなるようです。
チューニング後のパラメータで再学習
チューニングされたパラメータを使って再度XGBoostで学習を行います。
params["max_depth"] = 6
params["eta"] = 0.01

model = xgb.train(params=params,
                  dtrain=dtrain,
                  num_boost_round=1000,
                  early_stopping_rounds=5,
                  evals=[(dtest, "test")]) # dtestで評価を行う
# 出力(途中、省略)
[20:18:44] WARNING: d:\bld\xgboost-split_1619725139497\work\src\objective\regression_obj.cu:171: reg:linear is now deprecated in favor of reg:squarederror.
[20:18:44] WARNING: ..\src\learner.cc:573:
Parameters: { "silent" } might not be used.
This may not be accurate due to some parameters are only used in language bindings but
passed down to XGBoost core. Or some parameters are not used but slip through this
verification. Please open an issue if you find above cases.
[0] test-rmse:9.31060
[1] test-rmse:9.22415
[2] test-rmse:9.13866
[3] test-rmse:9.05419
[4] test-rmse:8.97052
[5] test-rmse:8.88764
・・・(長いので、途中省略)
[616] test-rmse:1.97222
[617] test-rmse:1.97227
[618] test-rmse:1.97232
[619] test-rmse:1.97256
[620] test-rmse:1.97252予測と精度確認
最適なパラメータで学習されたXGBoostモデルを使ってテストデータに対する予測を行い、正解値との比較を行います。
prediction = model.predict(xgb.DMatrix(X_test), ntree_limit=model.best_ntree_limit) # 一番良いモデルで予測する

plt.figure(figsize=(12, 12))
plt.scatter(y_test[:1000], prediction[:1000], alpha=0.2) # 表示の関係で1000個までとする
plt.show()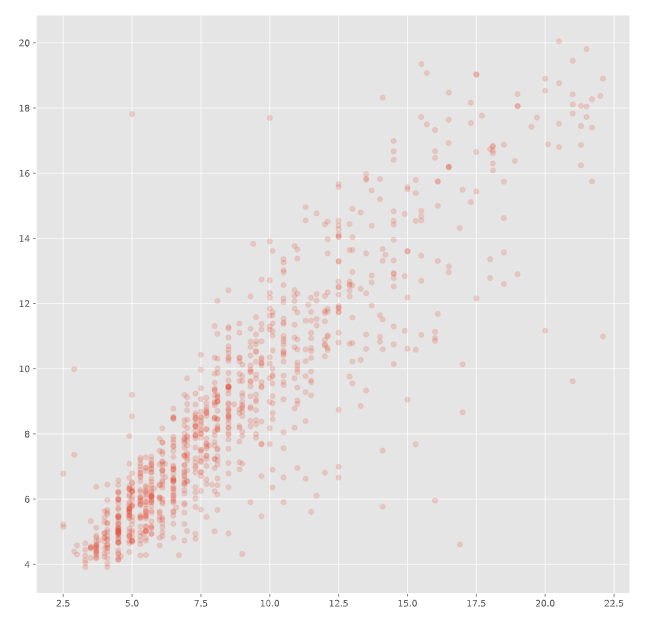
上記は、横軸が正解値、縦軸が予測値としての散布図です。スペースの関係で1000個のみ表示しています。傾き1の直線になる事が理想ですが、その周辺に点が集中しているのである程度は予測が上手くいっているようです。
feature importanceの表示
XGBoostでは、予測に影響を与えているfeature importanceを寄与順に出力することが出来ます。
git, ax = plt.subplots(figsize=(12, 12))
xgb.plot_importance(model, max_num_features=12, height=0.8, ax=ax)
plt.show()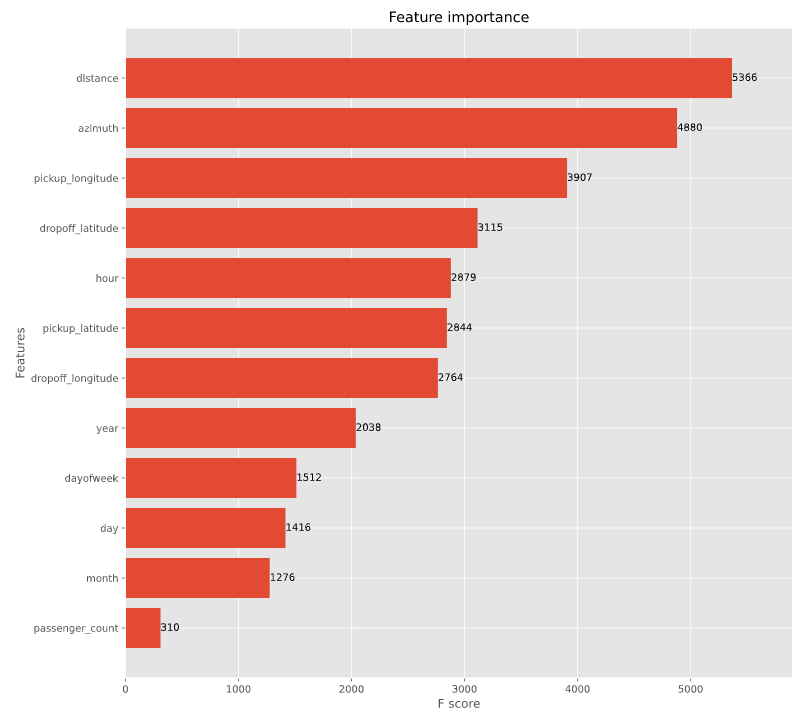
移動距離が料金に大きく影響を与えている事が分かり、直感とも一致します。
XGBoost + Optunaでハイパーパラメータチューニングをしてみる
先程はグリッドサーチでハイパーパラメータチューニングを行いましたが、総当たりで行う手法であるため、データ数が多い場合や、パラメータの組み合わせ数が多くなった場合に膨大な時間がかかってしまいあまり現実的でない場合があります。OptunaはTree-structured Parzen Estimator というベイズ最適化アルゴリズムの一種を用いることで、効率的なパラメータ探索を行います。
Optunaのインストール
Anacondaを利用している場合、Anaconda promptを起動して以下のコマンドを入力します。
conda install -c conda-forge optunaAnaconda以外の場合は、以下のコマンドを入力します。
pip install optunaoptunaパッケージのインポート
パッケージをインポートします。
import optunaOptunaの基本的な使い方イメージ
Optunaでは、objectiveという関数を定義し、その中に探索したいパラメータの範囲、学習、評価のコードを記述します。objective関数の返り値は評価値(例えば、rmseなど)をfloatで返します。
def objective(trial):
    # 探索したいパラメータの範囲を記述
    # モデル定義、学習
    # 評価
    return val_score
一方、呼び出し元(jupyter notebookならobjective以下のセルなど。.pyならmain関数などに記述)では、optuna.create_study()のインスタンスを作成し、optimize関数の引数に上記で定義したobjectiveおよびトライアル回数を指定します。
study = optuna.create_study()
study.optimize(objective, n_trials=1000)
optimizeする際、デフォルトでは評価値(上記のval_score)を最小化するような探索を行いますが、最大化するような最適化を行いたい場合はdirectionという引数に”maximize”を指定することで可能となります。
study = optuna.create_study(direction="maximize")
study.optimize(objective, n_trials=1000)
ちなみに、トライアルの上限を回数で指定しましたが、時間で指定したり、両方指定することも出来ます。
study = optuna.create_study()
# 5分過ぎたら探索を打ち切る
study.optimize(objective, timeout=300)
study = optuna.create_study()
# 1000回試行が終わらなくても、5分過ぎたら探索を打ち切る
study.optimize(objective, n_trials=1000, timeout=300)objective関数の定義
先程のニューヨークタクシーのデータを使って、Optunaによるパラメータ探索を行いたいと思います。まずはobjective関数を定義し、その中でパラメータの探索範囲の指定、xgboostの学習、cross validationによる評価を記述します。
パラメータ探索範囲の指定ですが、trial.suggest_XXXで指定します。例えば、trial.suggest_int(“max_depth”, 6, 9)ならmax_depthを6,7,8,9の中で動かしながら探索するような感じです。
cross validationの分割数は先程同様に5分割、num_boost_roundやearly_stopping_roundsも先程同様の値、評価値もrmseと同じままです。cross validationが終わったら、testに対するrmseの平均値の最小値(一番良かった物)を返り値としてreturnします。
def objective(trial):

    params = {
        "silent": 1,
        "max_depth": trial.suggest_int("max_depth", 6, 9),
        "min_child_weight": 1,
        "eta": trial.suggest_loguniform("eta", 0.01, 1.0),
        "tree_method": "exact",
        "objective": "reg:linear",
        "eval_metric": "rmse",
        "predictor": "cpu_predictor"
    }

    cv_results = xgb.cv(
        params,
        dtrain,
        num_boost_round=1000,
        seed=0,
        nfold=5, # CVの分割数
        metrics={"rmse"},
        early_stopping_rounds=5
    )

    return cv_results["test-rmse-mean"].min()
optunaの実行
呼び出し側では以下のコードを記述し、objectiveの返り値が最小となるようなハイパーパラメータを探索します。
study = optuna.create_study()
study.optimize(objective, n_trials=5000)
# 出力(途中、省略)
Output was trimmed for performance reasons.
To see the full output set the setting "jupyter.textOutputLimit" to 0.
...
04:09] WARNING: d:\bld\xgboost-split_1619725139497\work\src\objective\regression_obj.cu:171: reg:linear is now deprecated in favor of reg:squarederror.
[03:04:09] WARNING: ..\src\learner.cc:573:
Parameters: { "silent" } might not be used.
This may not be accurate due to some parameters are only used in language bindings but
passed down to XGBoost core. Or some parameters are not used but slip through this
verification. Please open an issue if you find above cases.
[03:04:09] WARNING: d:\bld\xgboost-split_1619725139497\work\src\objective\regression_obj.cu:171: reg:linear is now deprecated in favor of reg:squarederror.
[03:04:09] WARNING: ..\src\learner.cc:573:
Parameters: { "silent" } might not be used.
This may not be accurate due to some parameters are only used in language bindings but
passed down to XGBoost core. Or some parameters are not used but slip through this
verification. Please open an issue if you find above cases.
[I 2021-05-07 03:04:10,901] Trial 4988 finished with value: 1.9683766000000003 and parameters: {'max_depth': 6, 'eta': 0.10737072004360855}. Best is trial 4091 with value: 1.9441541999999998.
[03:04:10] WARNING: d:\bld\xgboost-split_1619725139497\work\src\objective\regression_obj.cu:171: reg:linear is now deprecated in favor of reg:squarederror.
[03:04:10] WARNING: ..\src\learner.cc:573:
Parameters: { "silent" } might not be used.
・・・(長いので、途中省略)
[03:04:28] WARNING: d:\bld\xgboost-split_1619725139497\work\src\objective\regression_obj.cu:171: reg:linear is now deprecated in favor of reg:squarederror.
[03:04:28] WARNING: ..\src\learner.cc:573:
Parameters: { "silent" } might not be used.
This may not be accurate due to some parameters are only used in language bindings but
passed down to XGBoost core. Or some parameters are not used but slip through this
verification. Please open an issue if you find above cases.
[I 2021-05-07 03:04:30,321] Trial 4999 finished with value: 1.9535236 and parameters: {'max_depth': 6, 'eta': 0.0731799487450153}. Best is trial 4091 with value: 1.9441541999999998.トライアル回数n=5000で、私のPCだと3時間くらいかかりました。
ベストパラメータを確認します。
print("Number of finished trials: ", len(study.trials))
print("Best trial:")
trial = study.best_trial

print("  Value: {}".format(trial.value))
print("  Params: ")
for key, value in trial.params.items():
    print("    {}: {}".format(key, value))
# 出力
Number of finished trials: 5000
Best trial:
Value: 1.9441541999999998
Params:
max_depth: 6
eta: 0.08293782123794514チューニング後のパラメータで再学習
チューニングのベストパラメータで再学習を行います。
params["max_depth"] = trial.params["max_depth"]
params["eta"] = trial.params["eta"]

model = xgb.train(params=params,
                  dtrain=dtrain,
                  num_boost_round=1000,
                  early_stopping_rounds=5,
                  evals=[(dtest, "test")]) # dtestで評価を行う
# 出力(途中、省略)
[08:06:08] WARNING: d:\bld\xgboost-split_1619725139497\work\src\objective\regression_obj.cu:171: reg:linear is now deprecated in favor of reg:squarederror.
[08:06:08] WARNING: ..\src\learner.cc:573:
Parameters: { "silent" } might not be used.
This may not be accurate due to some parameters are only used in language bindings but
passed down to XGBoost core. Or some parameters are not used but slip through this
verification. Please open an issue if you find above cases.
[0] test-rmse:8.67514
[1] test-rmse:8.01377
[2] test-rmse:7.41052
・・・(長いので、途中省略)
[75] test-rmse:1.97143
[76] test-rmse:1.97154
[77] test-rmse:1.97220
[78] test-rmse:1.97190
[79] test-rmse:1.97178上記「XGBoost (2) Grid Search + Cross Validation でパラメータチューニング」だとtest-rmse 1.97222に対し、optunaを使った場合で1.97143なので、精度に大きな差が無いような気がします。(今回は用いるデータ数が少なかったのと、探索する範囲も広く無かったから?)
まとめ
今回は、XGBoostの使い方についてや、グリッドサーチによるパラメータチューニング、optunaによるパラメータチューニングについてまとめました。XGBoostはkaggleなどで今でもよく使われる強力な手法で、それにoptunaを組み合わせてパラメータ探索を行う事により、効率的に良いモデルを作成することが出来ると期待しています。
(2021.05.07 追記)
@nzw0301さんよりコメントを頂きました。grid-search samplerを使った方が比較がしやすそうです。どこかのタイミングで試そうと思います。